
Tutorial More Canvas Game Engine
We last finished up getting some basic functionality out of the game engine after going through several long tutorials. Sorry about that but I wanted to cover some core information I have learned over the years when working with JavaScript and now adding in the Canvas parts.
In this next tutorial we will continue working on the game engine and adding more functionality so the engine becomes more interactive. We will have some fun with rotating an object around a rotating object. Yes that sounds strange but basically we will be able to simulate stuff like a planet rotating around a sun and a moon rotating around the planet. The good news is there will be very little math involved because the game engine has already taken care of the hardest parts for us.
To start if you haven’t already done so open up a command prompt / console window and run the “grunt watch” command. If you need a refresher you can look back at this tutorial.
Now with grunt watching time to start working again. We are going to need to add several code snippets to our pipe line. One of the biggest helping tools we will add is the ability to draw a green dot where the pivot point is located. This will help visually to aid in the placement of the pivot point of our objects. We will also add a basic rectangle shape class because rectangles are easier to see rotate then a circle.
Our first section of code to add will be to the base entity class itself. Open the entity.js file and find the definitions for me._speed and add the following line of code beneath it.
	me.drawPivotPt = false;
	me.pivot = new Vector2D({ x: 0, y: 0 });
The drawPivotPt is for diagnostics so when we create an entity we will want to turn this on if things are not rotating as expected. Then we define a basic pivot point at [0, 0]. For the most part setting the initial pivot point here will work just fine and usually we will adjust it when either we create a custom entity or when we create a new entity. Now then to continue adding diagnostic code we will want to add the following lines of code the engineDraw function just under the un-rotation code.
		// Check to see if we want to add a dot for the pivot point
		if (this.drawPivotPt) {
			var oldStyle = ctx.fillStyle;
			ctx.fillStyle = '#00dd00';
			ctx.beginPath();
			ctx.arc(0, 0, 3, 0, 2 * Math.PI, false);
			ctx.closePath();
			ctx.fill();
			ctx.fillStyle = oldStyle;
		}
For those that have been following along on this tutorial series the code should look very familiar because we used code like this in the EntityCircle draw function. We just are using the arc function to create a dot then calling the fill function to fill the dot in with green and returning everything back to normal. Viola we now have a way to draw the center point on entities.
For those that are wondering why I didn’t adjust my translation based on the center point I did this on purpose. To make an object drawn in the center we need to adjust for that in the individual entities we program and not in the base entity class. We will see an example of this when we create the rectangle entity class. For this to work with the existing circle we just need to modify our entitycircle.js file. Here is the update code that should replace the arc path code. I’ve bolded the changes so you can see where all the code should go.
		var p = me.pivot;

		ctx.beginPath();
		ctx.arc(-p.x, -p.y, this.radius, 0, 2 * Math.PI);
		ctx.closePath();
The first line just makes it so we don’t have to type so much to get to the x and y values of the pivot point. Next the ctx.arc function has changed and instead of using static values for the x and y parameters we are using the pivot point’s negative x and y values. We use the negative values of the pivot point in order to adjust for the original context translation, we will get further into this topic when we design the rectangle entity (do I sound like a broken record yet?).
Now that the circle has a pivot point created it is time to see how this all works. The HTML code is the same as previous example but the JavaScript code has changed to support and show how this new feature is going to work.
	<script>
		window.onload = start;
		function start() {
			var game = new GEngine({
				world:{
					canvasSize: { x: 400, y: 300 },
					fullWindow: true
				},
				canvasId: 'theEngine',
				fps: 60
			});
			var cir = new EntityCircle({
				color: '#ff0000',
				translate: {
					position: {x: 300, y: 150}
				},
				pivot: {x: 80, y: 0}
			});
			cir.orgUpdate = cir.update;
			cir.update = function (dt) {
				var newRot = (cir.translate().rotation() + 0.5) % 360;
				cir.translate().rotation(cir.translate().rotation() + 0.5);
			};
			game.add(cir);
			game.run();
		}
	</script>
For brevity this example is only showing the changed JavaScript code which is found in the tutorial-05.html file.
This is a side note but I wanted to point this out. In the last tutorial we used the body tag to call our start function which works but isn’t an acceptable solution for most JavaScript programmers. This example was shown only for a reference so new programmers could learn about this old school technique (yes I’ve been programming in JavaScript that long!).
The next change is setting the pivot point to something besides [0, 0] and to really show how the pivot point works I decided on setting it 80 pixels to really show off the rotation skills of the game engine. In the update module we deleted all the old code and add two line to handle the rotation. First we get the current rotation and add 0.5 degrees to it and then get the remainder of that value divided by 360. That is what the % sign is doing just returns the remainder which in our case clamps our rotation between 0 and 360 without having to call any special data tools. After that we just pass the new rotation back to our entity and we’re done.
Launch the html file in your browser and you should see something like this on your canvas.
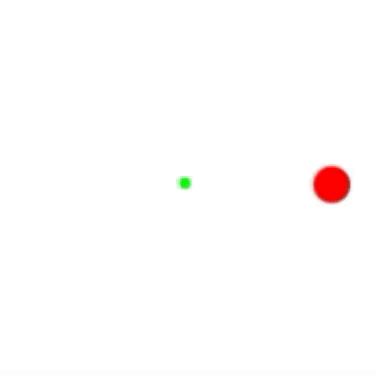
Real exciting isn’t it. The exciting part here is we have done some really simple math and not had to break into some crazy geometry and trigonometry math to get this to work. Don’t get me wrong if you want to do some really cool stuff this kind of math knowledge will go a long ways!
Creating a Rectangle Entity
So the much anticipated rectangle entity section is finally here that will explain everything we have put off in this tutorial and maybe some more. Like what is the meaning of life? We get to this answer later in this tutorial.
Create a new file and call it entityrect.js and place it in the entities folder. In the new file add these lines of code which are kind of a boiler plate for any entity class we create.
function EntityRect(cfg) {
	var me = this;
	var ent = new Entity(cfg);

	Object.assign(me, ent);
}
Nothing special in this code just yet but we will be adding to this new entity. The things we will want to track with the rectangle is the dimension of the rectangle, the line color and line width, and the fill color. Also I like to auto calculate the center point and set the pivot point here so that when we use a rectangle this isn’t an extra step we have to remember to do. So with these concepts in mind we will need to add the following code in bold to our exiting rectangle class. You I know the keyword defining the EntityRect is function but remember in JavaScript they treat functions and classes the same. You’ll get used to this weirdness after programming with it for a while. Although since I’ve been using JavaScript since its inception I still have a hard time getting used to this concept so don’t feel bad.
function EntityRect(cfg) {
	var me = this;
	var ent = new Entity(cfg);

	me.rect = { x: 0, y: 0, w: 80, h: 80 };
	me.color = '#000000';
	me.lineColor = null;
	me.lineWidth = null;

	Object.assign(me, ent);
	// Calculate the center point of our object
	this.pivot.x = ((this.rect.x + this.rect.w) / 2);
	this.pivot.y = ((this.rect.y + this.rect.h) / 2);
}
Whenever possible I like to try and include some kind of default value so that if someone forgets to fill in a value our class won’t break. In this example you can see some basic default values for the rect which is an object that stores the x and y position of the rectangle and then the height and width. The nice thing about canvas is the rect command doesn’t make use do complicated math when drawing a rectangle. Unlike other graphic systems I have used they want to know the upper left point and the lower right point to draw a rect. So when you want to add in a pivot point you have to adjust two points instead of one.
Now that we have some basic values for the rectangle it is time to draw one. For that we need to create our custom draw function. Add this code just after the pivot point calculations.
me.draw = function (ctx) {
		var oldStyle = ctx.fillStyle;
		var oldStroke = null;
		if (this.lineColor !== null) {
			oldStroke = ctx.strokeStyle;
			ctx.strokeStyle = this.lineColor;
		}

		var r = this.rect;
		var p = this.pivot;
		if (this.color !== null) {
			ctx.fillStyle = this.color;
			ctx.fillRect(r.x - p.x, r.y - p.y, r.w, r.h);
		}

		if (oldStroke !== null) {
			var lw = ctx.lineWidth;
			if (this.lineWidth !== null) {
				ctx.lineWidth = this.lineWidth;
			}
			ctx.strokeRect(r.x - p.x, r.y - p.y, r.w, r.h);
			ctx.strokeStyle = oldStroke;
			ctx.lineWidth = lw;
		}

		ctx.fillStyle = oldStyle;
	};
The code in bold is the code that is different from the draw function in our circle entity class. The first two variables are added because again I hate typing a lot of code and these help shortcut accessing these values. If the color is defined for the rectangle we will draw a rectangle filled in with the fillRect function on our context. This function just takes the x and y point on the canvas where to start drawing and then the width and height. The big thing here is we want to make sure we take the rectangle x and y positions and subtract the pivot point values (answer to a previous discussed concept). The last bit of code just deals with drawing an outline rectangle and most of the code wrapped in this if statement is just there to restore the context state.
Now then let’s take this new entity for a test drive. If everything is done correctly we should be able to instantiate our entityrect class and put it in the game engine for drawing. Go back to the tutorial-05.html file and modify the entity object. I just deleted all the code that we created for the EntityCircle entity and started from fresh with just the basic game engine definitions.
	<script>
		window.onload = start;
		function start() {
			var game = new GEngine({
				world:{
					canvasSize: { x: 400, y: 300 },
					fullWindow: true
				},
				canvasId: 'theEngine',
				fps: 60
			});
			game.run();
		}
	</script>
This is starting to look like a boiler plate code for our HTML file. In a future tutorial we will move this out of the HTML file and into a game file. But for now these are just simple tests so we will just keep it in the HTML file. Now add the following code just after the game definition.
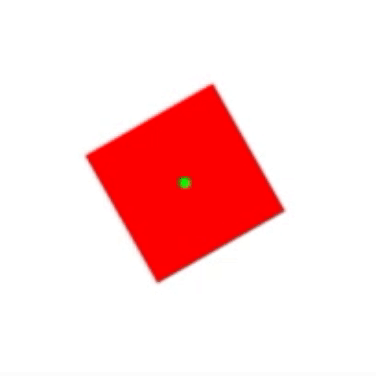
var box = new EntityRect({
				color: '#ff0000',
				translate: {
					position: {x: 300, y: 150}
				},
				drawPivotPt: true
			});
			box.update = function (dt) {
				var newRot = (this.translate().rotation() + 0.5) % 360;
				this.translate().rotation(newRot);
			};
			game.add(box);
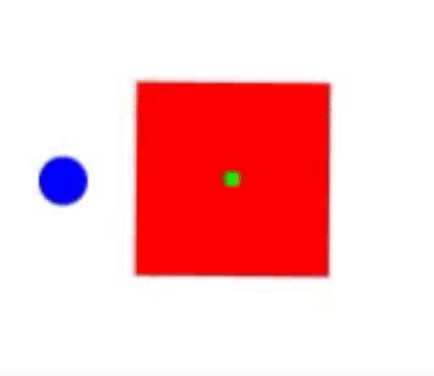
So we define a variable called box and just instantiate it as an EntityRect object. For now we pass in some basic configuration settings like changing the black color to red. Bull like to charge anything with red on is so why not use this color. Anyways after the box is create we use the same update function as we did for the circle. You may be wondering why didn’t we change the pivot point on the rectangle? The answer is the core class puts it in the center and I wanted to show how this feature works. If we didn’t change it on the circle we would have never seen the circle rotate. Try it sometime and you’ll see what I mean. Now open or refresh your browser and you should see the following square rotating with a green dot in the center.
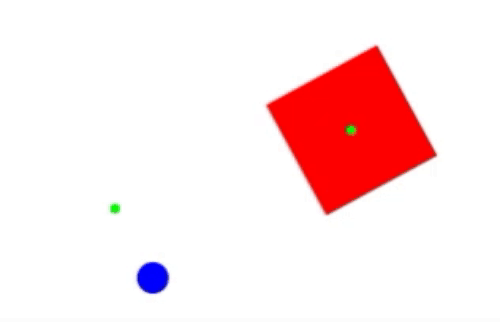
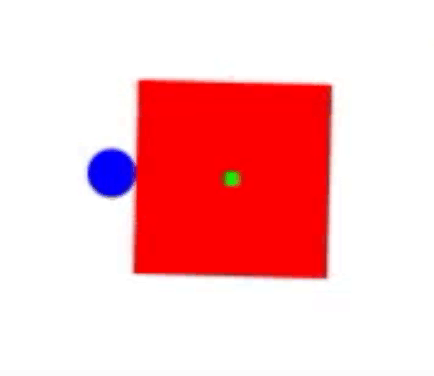
Here are some of the different things we can now do with the game engine. For now these are just images with no code, I leave it up to you the reader to try and figure out how this was done. There was no changes to the base game engine and entities it was just how the “game code” was created. If you need help just ask me and I’ll try and help guide you but part learning to program is taking what is given and going beyond.
This one should be too hard to figure out. Good luck and have fun with this one.
In this example the ball looks like it is rotating faster than the square but both rotation speeds for the entities is set to 0.5 degrees per frame. The key is how you add the entities to the game world.
Here is a hard one. It looks simple but alas having the ball rotate in the opposite direction cause me a few headaches. The algorithm you’ll want to write will add the max angle to the current angle value then subtract the rotation speed from that value and then divide it by the max angle. Confusing right but if you need help just ask me.

This one breaks the mold and doesn’t something different. This example uses very little math other then it checks to see if the position of the ball tries to go outside the square it then flips the ball’s speed like we have seen in previous tutorials. Again try and use the engine and the hierarchy to make the field