Getting Started with Node.js
For those who are interested in getting a Node.js development setup this tutorial is for you. Since Node.js is based on JavaScript we will want to find a good JavaScript editor. In the past I've used Aptana for doing some hard core JavaScript development. It is based on the eClipse editor but they interfaced it in a way that has always made sense to me and is easy to use. You can also use Sublime Text editor, or Notepad++, or Visual Studio. It depending on your IDE preference. My only recommendation is to find an IDE that will do most of what you want, try it out and see if it fits your design needs.
Now since this is about Node.js and not an IDE we will focus on how to get it installed. To start we will want to jump over to nodejs.org and click downloads in the menu. You should see a page like this:
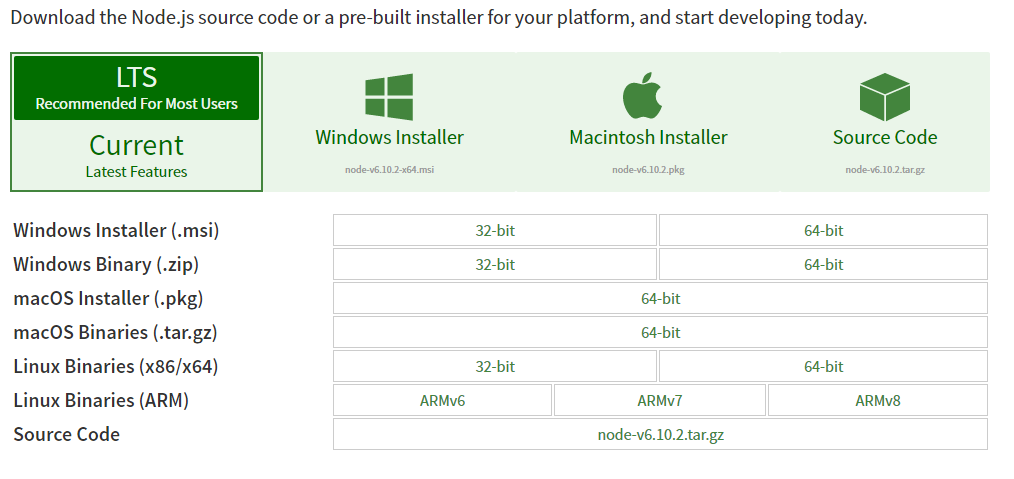
Since I’m on Windows 10 I selected the 64bit msi installer. If you’re using Linux then I would recommend you use a package manager to install Node.js. While it is downloading I suggest you read their about page which show the amazing process of building a webserver in 8 lines or less of code.
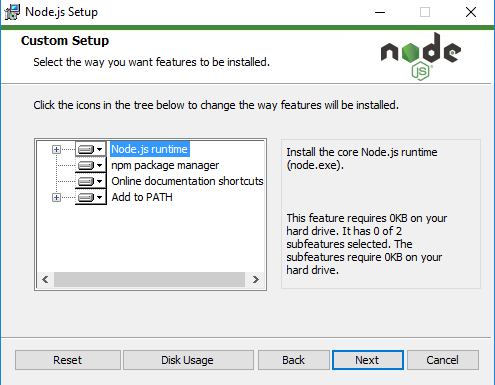
Now open your folder where you downloaded the node install file and double click it to launch the install process. You will need to accept the software license agreement and from there just take the default settings. When you get to the feature selection make sure to install npm package manager. This one tool is very helpful tool which will help use automate many of the mundane tasks.
Once the install completes open a command prompt (yes mac have this too since they move to a *nux based OS). For those PC people on Windows 8.1 or Windows 10 just right click the Windows icon in the task bar and select command prompt. Now type
C:\>node --version
to verify that node has been installed and is ready for us to play in it. Depending on when you are reading this tutorial it should show you a single line of text stating the current version installed.
Now that node is installed what can we do? Npm is a good start where you can find all different kinds of tools/packages available to Node which we can use to build our own applications. For example we are going to use the Grunt task runner tools to build a simple JavaScript based game. First create an empty directory where we want the project to be stored. For me I just created a folder called grunt on my C: drive (not recommended). To create the directory just type
C:\>mkdir c:\grunt
C:\>cd c:\grunt
Now we are ready to setup this folder as our project folder. There are a couple of different ways we can start our project. One way would be to create a new file in the folder called package.json and enter a whole lot of information which I always forget what goes into it. Or the way we will do it in this tutorial is to use npm to help setup our project.
C:\grunt>npm init
For this tutorial you can either answer the question like in the screen shot or answer them with your own information.
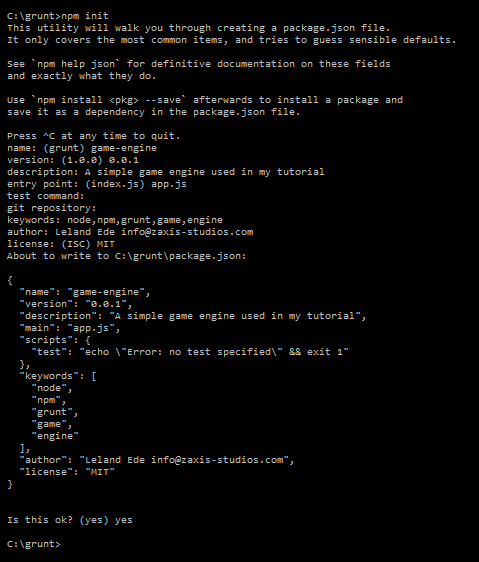
Once done type in dir and you will see there is a new file in this folder. The package.json file is used to help us and other collaborators keep track of the different npm modules we might use to build our project. JSON just stand for JavaScript Object Notation and in this case store the basic information about the packages we use will be using.
There are lot of packages available so how do we know which ones to use? The simple answer is visit the npm website and look at the most popular packages. These are the ones lots of developers are using on a daily, weekly, and monthly basis. But the sad thing is there are a ton of great packages that are not popular so they rarely if ever show up in the list. The npm site has a decent search engine but you may have to think of different terms to search on to find the tool you want to use.
Now that we have a package file in our directory it is time to install grunt. To do this type
C:\grunt>npm install grunt --save-dev
Once that is done we will also want to install a smaller package to assist us on the command line with using grunt
C:\grunt>npm install grunt-cli --save-dev
Now our project is ready to use grunt. We can now build a basic task and like most first time programs we will create the famous hello world for grunt. To do this we will need to create a grunt file so type
echo //Gruntfile.js >> Gruntfile.js
Make sure to use a capital G in grunt because it is case sensitive even on Windows! It took me a few hours to figure this one out the first time. Open the Grintfile.js in any text editor and type in the following code:
module.exports = (g) => {
	g.registerTask('default', 'Hello demo', function(){
		g.log.writeln('Hello world!');
	});
};
Save the file. In this code example it uses the new and streamlined way to define a function. We could of written the first line to me module.exports = function(g){… and it would work the same. This is because the current version of node it uses the new EM6 standards. If your unfortunate to be still stuck using EM5 you will have to use the old way of defining a function instead of the new slick and sexy way.
Anyways this first line defines for grunt a new function to run when we call the grunt task runner on the command line. The second line defines a default task, more on task later, and tells grunt what function to run which then we just do a simple output of text to the console.
Go back to your command prompt and type
C:\grunt>grunt
You should see the following message on the command prompt.
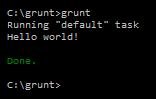
I know this must be the most exciting program ever written in grunt! Okay so it is lame but it shows the basic layout we will be using in the grunt file to help automate our build process. The first thing you should note is the start part of the file where we setup grunt to call our function which then registers a default task. Alternatively we could of typed
C:\grunt>grunt default
and we would get the same results. If we don’t pass a task to grunt it will look for the default task definition and run that task. It is good practice to define a default task. What the default task does is up to you. It could do the basic build of your project or write your documentation to the console so developers will see the different defined tasks we have defined in our grunt file. In this tutorial we will use it for documentation to tell new developers how to use the grunt system.
Wouldn’t it be nice if we make a change to a file we could do a whole bunch of tasks like copy all our development files into our build folder? Well with grunt we can! For this one we will install two new grunt packages. The first is the watch package which will let us monitor changes to our source code and then perform a set of defined tasks. The second package will be the simple copy package which will copy a defined set of files from the source directory to a destination directory.
C:\grunt>npm install grunt-contrib-watch --save-dev
C:\grunt>npm install grunt-contrib-copy –save-dev
Notice that after installing the packages there is a new folder in our grunt folder called node_modules. This is a local folder that stores a local copy of the modules we will be using to build our project. This is just the first step is to install the module the next is to add new tasks and configurations to the Gruntfile.js which will tell grunt how they are used.
Note: if you see the prefix grunt-contrib this means that the package is maintained by the grunt team. These packages are typically well maintained.
Now that we have the copy and watch packages installed we need to tell the grunt system they are available and provide some basic settings. For these next steps we will want to create a couple of new folders in our project. Type
C:\grunt>mkdir src
C:\grunt>mkdir build
We will use src is the directory where we will create our project and use grunt to monitor and build our final release. The release will be built into the build folder which then we can copy to a webserver for viewing. In your own projects you can name these folder whatever you want but it is recommended as a standard to use these folder names.
The first thing we will want to do is monitor the src directory for any files that change and then run the copy command to move them from src to the build folder. Further in the tutorial we will be changing what to copy because at some point we will want to break the game client into multiple files for easier management. Now that we have a place to put our code we will modify the Grintfile.js to tell grunt we have two new modules to load. Add these lines to the bottom of the grunt file just before the last closing curly bracket (};):
	g.loadNpmTasks('grunt-contrib-copy');
	g.loadNpmTasks('grunt-contrib-watch');
These two lines tells grunt that we want to load the copy and watch packages. Now we need to initialize grunt and the new packages so add the following lines to the file just after the first opening bracket ({) and before the g.registerTask:
 	g.initConfig({
		copy: {
			main: {
				files: [
					{
						expand: true,
						cwd: 'src',
						src: ['**'],
						dest: 'build/'
					}
				]
			}
		},
		watch:{
			src:{
				files: ['src//**/*'],
				tasks: ['copy']
			}
		}
	});
The initConfig function helps us define new tasks that we can then run from the command line. For this example we will use the following command to watch our project:
C:\grunt>grunt watch
Now when we add or modify a file it will call the copy task for use automatically, to exit the watch task press + . Even though this is a simple example we can add more tasks to the task watch that will automate a lot of steps we would normally have to type in on the command line. For example in a project I’m using for the game server tutorial I have it compile all my js code, next it checks for any basic js errors using jshint, then it compresses/minifies the js file, and finally uploads it to my development web server.
Now that we have the basic stuff setup for grunt we can go onto the next tutorial where we will add a couple of more packages to the project which will help automate our build process. See you next time!
You can follow this tutorial and get all source files from our github project.